
-
Modern JavaScript Asynchronous processing modelFrontEnd/JavaScript 2023. 3. 3. 14:37

Asynchronous / Synchronous
1. 비동기식 처리모델
- Task가 종료되지 않은 상태여도 대기하지 않고 다음 Task 실행 (Non-Blocking)
- 서버 응답에 따라 이벤트 핸들러가 Task 수행 (순차적이지 않음)
- JavaScript 대부분의 DOM 이벤트 핸들러와 Timer 함수(setTimeout, setInterval), Ajax 가 해당

Event Loop Modl - func1 호출시 Call Stack이 쌓이고 func2를 호출하여 차례로 Stack이 쌓이며 setTimeout이 호출됨
- setTimeout 콜백함수는 즉시 실행되지 않고 지정되 대기 시간만큼 기다리다가 tick 이벤트 발생시 Task Queue로 이동
- Call Stack이 비어졌을시 Call Stack으로 이동
2. Ajax (Asynchronous JavaScript ans XML)

- Request HTML, CSS, JavaScript 파일들을 서버에서 반환됨
- 웹페이지가 반환되면서 클라이언트(Browser)를 Rendering 한 것을 화면에 표시
- 위의 과정을 거치면서 서버와 브라우저가 데이터를 비동기적으로 교환하며 통신
- 화면 전체를 로드하는 것이 아닌 일부만 로드하므로 화면전환이 빠름

Ajax Lifecycle
3. JSON (JavaScript Object Notation)
- 클라이언트와 서버간 데이터 교환을 위한 데이터 포맷
- JSON.stringify Method로 객체를 JSON 형식 문자열로 변환
- JSON.parse Method로 문자열을 객체로 변환 (역직렬화 : Deserializing)
// stringify, parse 예시
const o = { name: 'Lee', gender: 'male', age: 20 };

// 1. 객체 => JSON 형식의 문자열
const strObject = JSON.stringify(o); // string {"name":"Lee","gender":"male","age":20}

// 2. 배열 객체 => 문자열
const strArray = JSON.stringify(arr);// string [1,5,"false"]

// 3. JSON 형식의 문자열 => 객체
const obj = JSON.parse(strObject);   // object { name: 'Lee', gender: 'male' }

// 4. 문자열 => 배열 객체
const objArray = JSON.parse(strArray);// object [1, 5, "false"]
4. XMLHttpRequest
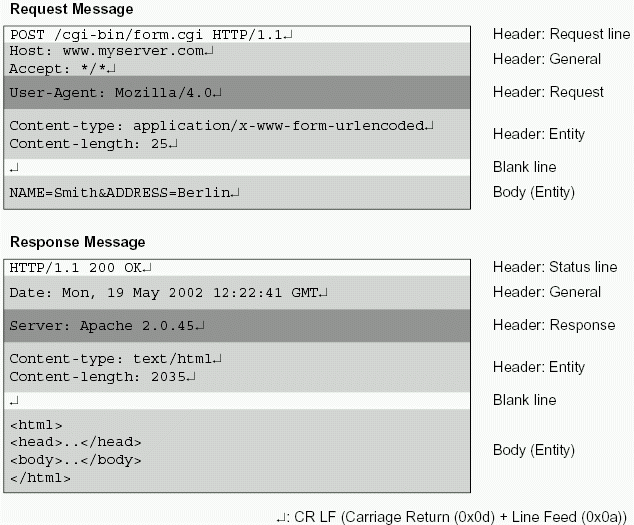
Request / Response Message - XMLHttpRequest Object를 이용하여 Ajax 요청을 생성하고 전송 (요청에 대한 응답 결과처리)
- Ajax Request
// Get 형식 : URL의 일부분인 쿼리문자열(query string)로 데이터를 서버로 전송 // 1. XMLHttpRequest 객체의 생성 과정 const xhr = new XMLHttpRequest(); // XMLHttpRequest 객체 생성 xhr.open('GET', '/users'); // 비동기 방식으로 Request를 오픈 xhr.send(); // Request를 전송 // 2. open: XMLHttpRequest.open(method, url[, async]) // method : HTTP method (“GET”, “POST”, “PUT”, “DELETE” 등) // url : 요청을 보낼 URL // async : 비동기 조작 여부. 옵션으로 default는 true // 3. send // xhr.send('string'); // xhr.send(new Blob()); // 파일 업로드와 같이 바이너리 컨텐트를 보내는 방법 // xhr.send({ form: 'data' }); // xhr.send(document); // Post 형식 : 데이터(페이로드)를 Request Body에 담아 전송 // 1. json으로 전송하는 경우 xhr.open('POST', '/users'); // 2. 클라이언트가 서버로 전송할 데이터의 형태설정 // HTTP Request Header의 값 설정 // Accept 헤더를 설정하지 않으면, send 메소드가 호출될 때 Accept 헤더가 */*으로 전송 xhr.setRequestHeader('Content-type', 'application/json'); // MIME-type : json 형태 const data = { id: 3, title: 'JavaScript', author: 'Park', price: 5000}; xhr.send(JSON.stringify(data));- MIME-type
Type SubType text 타입 text/plain, text/html, text/css, text/javascript Application 타입 application/json, application/x-www-form-urlencode File을 업로드하기 위한 타입 multipart/formed-data - Ajax response
// 1. XMLHttpRequest 객체의 생성 const xhr = new XMLHttpRequest(); // 2. XMLHttpRequest.readyState 프로퍼티가 변경(이벤트 발생)될 때마다 // onreadystatechange 이벤트 핸들러가 호출 // 3. readyStates는 XMLHttpRequest의 상태(state)를 반환 // 4. readyState: 4 => DONE(서버 응답 완료) // 5. status는 response 상태 코드를 반환 : 200 => 정상 응답 xhr.onreadystatechange = function (e) { if (xhr.readyState !== XMLHttpRequest.DONE) return; if(xhr.status === 200) { console.log(xhr.responseText); } else { console.log('Error!'); } }; // 6.onreadystatechange : Response가 클라이언트에 도달하면 호출 xhr.onreadystatechange = function (e) {};- 정상적인 Reponse의 경우
Value State Description 0 UNSENT XMLHttpRequest.open() 메소드 호출 이전 1 OPENED XMLHttpRequest.open() 메소드 호출 완료 2 HEADERS_RECEIVED XMLHttpRequest.send() 메소드 호출 완료 3 LOADING 서버 응답 중(XMLHttpRequest.responseText 미완성 상태) 4 DONE 서버 응답 완료
5. Web Server
- Node.js의 경우 Express로 WebServer 생성가능
## 1. 데스크탑에 webserver-express 폴더 생성 $ cd ~/Desktop $ git clone https://github.com/ungmo2/webserver-express.git $ cd webserver-express ## 2. install express $ npm install ## 3. create public folder $ mkdir public ## 4. webserver 실행 $ npm start'FrontEnd > JavaScript' 카테고리의 다른 글
Modern JavaScript REST API / SPA (0) 2023.03.04 Modern JavaScript Event (0) 2023.03.04 Modern JavaScript Document Object Model (0) 2023.03.01 Modern JavaScript Array (0) 2023.02.25 Modern JavaScript 정규표현식 (0) 2023.02.18